Oracle Integration Cloud (OIC) - Integration Activation

 Activate an Integration

Once you create an integration and the progress indicator shows 100 percent, you can activate that integration to the runtime environment. An integration shows as 100% and is eligible for activation after you have specified the source connection, the target connection, the data mappings, and the tracking fields.

To activate an integration:

Note: 

If you activate a new version of an existing integration, tracking instances or logs of the old version are not deleted. However, related artifacts are deleted and redeployment is performed on the back end. Monitoring data is also removed.
  1. In the left navigation pane, click Home > Integrations > Integrations.
  2. Go to the row of the integration to activate.
  3. Click the Activate icon icon to activate the integration.
    The Confirmation dialog is displayed.
  4. Select options appropriate to your integration.
    ElementDescription

    Contribute integration mappings to Oracle Recommendations

    Click to enable the Oracle Recommendations Engine.

    Uses the collective intelligence to recommend which fields should be mapped while developing an integration. These recommendations are built based on the mappings contributed to Oracle Recommendations Engine anonymously. You can change this on the Recommendations page by selecting Settings > Recommendations in the navigation pane.

    Enable Asserter Recording

    Click to capture payloads and record instances for playing back and testing,

    Enable tracing

    Click to enable detailed tracing information in the activity stream.

    When this checkbox is selected, detailed logging information about messages processed by this integration flow at runtime is collected. This can aid in troubleshooting issues. However, detailed tracing may also impact performance. To disable tracing, you must deactivate the integration, then reactivate it without selecting the Enable tracing checkbox.

    If you do not enable tracing, minimal logging details are created in ics-flow.log to indicate when the activated integration begins and completes execution (regardless of execution success or failure). You can download the logs on the Dashboard page.

    If you want to enable payload tracing to log input and output payloads to the activity stream, click the Include payload checkbox.

    When this checkbox is selected, information from the payload is also written to the log files, which can be downloaded and viewed. For example, you see more detailed logging information about payload activity at several points in the integration flow, such as the payload prior to data mapping and the payload after data mapping. This action can present a security risk and also impact the performance of your system. This setting is not recommended for a production environment.

  5. Select an activation option. The options available are based on the type of integration you are activating:
    1. Click Activate (if you are activating a nonscheduled integration).
    2. Click Activate and Schedule (if you are activating a scheduled integration).
      The Run integration_name page is displayed. Create a schedule for running this integration, and click Save
    A status message is displayed in the banner at the top of the page. For example:

    Description of integration_activation.png follows
  6. If integration is unsuccessful, an Activation Failed warning icon is displayed in the banner. If you click the icon, a dialog is displayed with the option to download details about the activation failure incident.
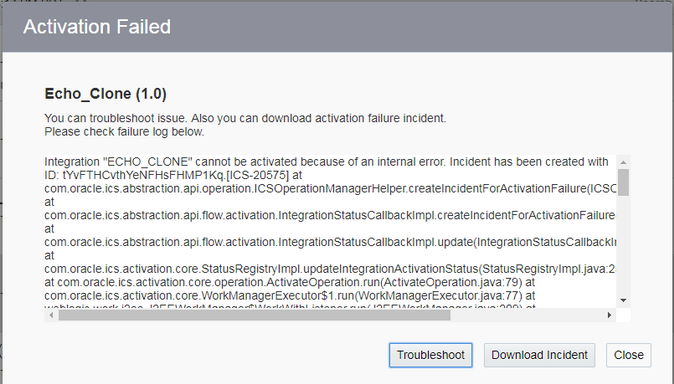
    Description of integration_active_fail.png follows
    1. If your integration includes a function that is not completely configured, an error message is displayed in the banner. You must complete configuration of this function before you can activate the integration. Click inside the integration and note the following errors/warnings:
      • An error icon is displayed on the function call action that uses the incomplete function. The Error panel on the right side of the integration canvas provides specific details about the incomplete function.

      • A warning icon is displayed on the mapper that uses the inputs and outputs of this function. After completing function configuration, you must verify the input and output mappings before activating the integration.

    If activation is successful, the status of the integration changes to ACTIVE in the row.
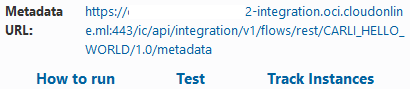
  7. Click the How to Run link icon to display details about how to run, test, and track instances for this integration.
    For example:Endpoint URL and How to run, Test, and Track Instances links.

    If you selected to enable tracing, the words TRACE ENABLED are displayed under the icon you clicked to activate the integration. If you click the integration instance on the Track Instances page, the hamburger menu menu includes an option called View Activity Stream for viewing payload details.

    To access the detailed trace logging information:

    1. In the left navigation pane, click Home > Monitoring > Integrations > Dashboards.

    2. Click Download Diagnostic Logs to download Oracle Integration logs and diagnostics logs.

  8. View active integrations by clicking the integration name or selecting View from the Actions menu menu. The active integration is displayed with a message saying View Only in the banner at the top.
Note the following details about read-only mode:
  • No Save button is displayed.

  • There are no InvokesActions, or Errors icons.

  • You can click through multiple parts of the integration to view configuration details, such viewing the business identifiers under the Tracking link, viewing the source-to-target and target-to-source mappings in the mapper, and viewing the configurations on the pages of the connection wizards, but you cannot modify anything.

Oracle Integration Cloud (OIC) - Integration Patterns

Introduction:
OIC is a PaaS service as available from Oracle used in developing integrations between SaaS application or on-premise application. Using drag and drop capabilities, an integration can easily be defined. Oracle Integration Cloud Service provides native connectivity to Oracle Software as a Service (SaaS) applications.

Integration
    Integration uses connections to implement business process. An integration includes at least a trigger or source connection and invoke or target connection and the field mapping between those two connections.
    OIC offers Six integration patterns which help us to build from simple to complex integrations. When we choose to build an Integration, the starting point is to choose from the available patterns.

1. App Drive Orchestration

The Orchestration patterns allows you to create from simple to complex integration. Create an integration that uses an event or a business object to trigger. For example, create an integration with an Salesforce adapter as a trigger and Oracle Sales Cloud as a invoke. Salesforce sends an Outbound messages which triggers an OIC integration. Use this pattern when you wanted to create complex integration. In Orchestration pattern, we can invoke any available activity as below:
  • For-Each activity to loop over the array element
  • Switch activity for the multiple routes
  • Scope activity to handle exceptions
  • Ad-hoc mapping
  • Wait activity to wait certain amount of time

2. Scheduled Orchestration

The pattern allows you to develop an integration which can be scheduled to run on pre-defined frequency as well as on ad-hoc basis. While using this pattern, a scheduled activity occurs as a trigger. For example, you add an initial invoke adapter to read a trigger file and a second FTP adapter to download the file for further processing. After designing this integration, you schedule when to run it. Use this pattern when you want to develop an integration which can run on some scheduled frequency.

3. File Transfer

This pattern create an integration to move the file across network. This is again a scheduled type of integration. Use this pattern when you wanted to move files from one FTP location to another.

4. Basic Routing

This help to create a very simple integration where you have single source and single target system with no logic and processing on data. Create an integration with a blank trigger and invoke in which to add your own adapters. You can also create a single routing expression and request and response enrichment’s, as needed. You cannot create multiple routing expressions. Use this pattern when you have single source and single target.

5. Publish to OIC

Oracle Integration Cloud, provide inbuilt messaging queues which you can leverage to publish and subscribe messages.

Create an integration in which you add a trigger adapter to publish messages to Oracle Integration through a predefined Oracle Integration Messaging invoke. No configuration of the invoke subscriber is required.

The publisher and subscribers participating in this integration pattern can be activated and deactivated independently of each other.

6. Subscribe to OIC

This pattern can only be used in conjunction of Public to OIC pattern.

Create an integration in which you add an invoke adapter to subscribe to messages from Oracle Integration through an Oracle Integration Messaging trigger. You are prompted to select the publisher to which to subscribe. You must have already created a publisher to which to subscribe. The publisher does not need to be active, but must already be completely configured.

Any business identifiers defined on fields in the published integration are copied to the subscriber. Any changes made to the published integration’s business identifiers after copying are not reflected in the subscriber. The publisher and subscribers participating in this integration pattern can be activated and deactivated independently of each other.

Oracle Fusion: Development of Custom BI Publisher Report

This blog is for Oracle Fusion Applications Beginners
Steps to develop Custom BI Publisher report in Oracle Fusion Cloud Applications

Step 1 : Creation of Data Model

Navigation : Navigator --> Reports and Analytics


Click on Browse Catalog

Page will be redirected to Business Intelligence Home Page
 

Click on New Icon which is available on let side of BI home Page


In Diagram tab click New Data Set -- SQL Query


Enter details

Name : Can give as per your Naming Standards (E. g SP_JOUR_DM)
Data Source : This can be selected based fusion DB Schema which we would like to access
Note :
ApplicationDB_FSCM ( Financial and Supply Chain Management )
ApplicationDB_HCM ( Human Capital Management )
ApplicationDB_CRM ( Customer Relationship Management )

Type of SQL: This is can based on Type of SQL which using for report

Standard SQL :Standard SQL used for normal SELECT statements interpreted to understand database schema
Procedure Call : query type to call a database procedure
To use REF cursor in Oracle BI Publisher :
Use this query type to issue SQL statements that can include the following:
Cursor statements that return nested results sets
Functions returning REF cursors
To use REF cursor in Oracle BI Publisher


In SQL Query Section we can provide Query If readily available . Otherwise can use Query Builder to Build Query for report
 
Click Ok . Then Save Data Model

Enter Details of Data Model


Click on Data Tab to save sample data ( This sample data is required to created layout)


Step 2 : Creation of Report

Click on Create Report Which is available in BI Home Page

Default Data Model will selected Click On Next


Select Page Options : Portrait
           Layout : Table

Click next


Drag Fields from Data Source --> Click Next

Click on Finish to Save report and View Output


We can report output in Interactive Dashboard


To View or Download output in different format . Click on View report icon which is available in extreme right corner .


Oracle Fusion : Supplier Bank Account REST APIs


(GET) External Payees


The below REST API is used to check whether the external payee exists or not.

Endpoint:

https://ERPCloudInstance/fscmRestApi/resources/latest/paymentsExternalPayees?finder=ExternalPayeeSearch;SupplierSiteIdentifier={SupplierSiteIdentifier},PayeePartyIdentifier={PayeePartyIdentifier},Intent=Supplier

{SupplierSiteIdentifier} represents the Supplier Site Id
{PayeePartyIdentifier} represents the Supplier Party Id

(GET) External Bank Account Details


The below REST API is used to check whether the external bank account exists for the supplier or not.

Endpoint:
1.To fetch all bank accounts of the supplier

https://ERPCloudInstance/fscmRestApi/resources/latest/externalBankAccounts?q=VendorId={VendorId}&finder=SearchExternalBankAccount;Intent=Supplier

{VendorId} represents the Supplier Id

2. To check for particular bank account using the attributes bank name , branch name, account number

https://ERPCloudInstance/fscmRestApi/resources/latest/externalBankAccounts?finder=SearchExternalBankAccount;BankName={BankName},BankBranchName={BankBranchName},BankAccountNumber={BankAccountNumber},Intent=Supplier

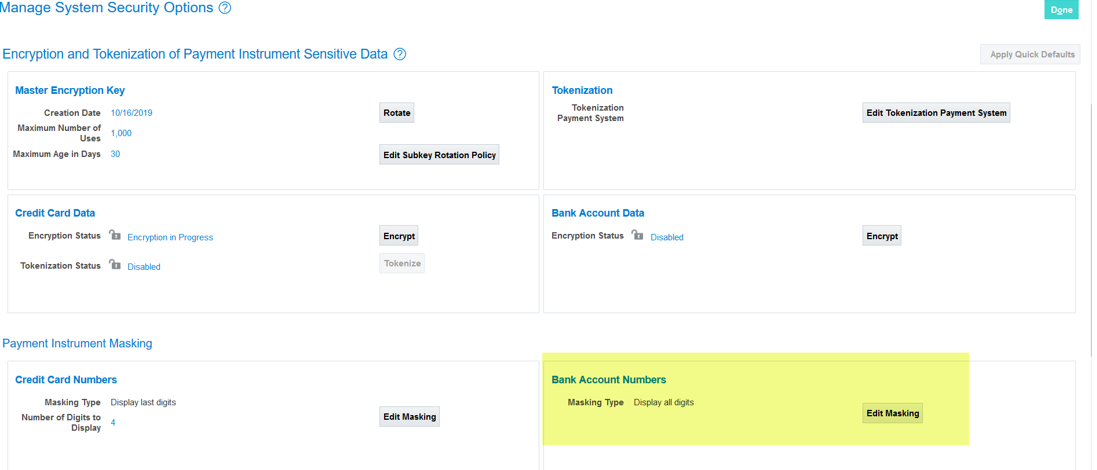
In order to check for bank account exits for the supplier, the bank account number masking should be kept as Display all digits in Manage System Security Options


For security reasons the bank number is kept masked , So querying the supplier bank account details w.r.t to bank account number is not possible.

(POST) Create External Bank Account and Bank Account Owners


The below REST API is used to create external bank account for the supplier.

Endpoint:

https://ERPCloudInstance/fscmRestApi/resources/latest/externalBankAccounts

Sample Request Payload:

{
"BankAccountNumber": "123456676765",
"CountryCode": "US",
"BankName": "DUMMY",
"BankNumber": null,
"BankBranchName": "DUMMY_0999",
"BankBranchNumber": null,
"CurrencyCode": "USD",
"AccountType": "SAVINGS",
"AllowInternationalPaymentIndicator": "N",
"Intent": "Supplier",
"PartyId": 23231231132,
"BankAccountName": "DDP_011",
"accountOwners": [
{
"AccountOwnerPartyIdentifier": 23231231132,
"Intent": "Supplier"
}
]}

{AccountOwnerPartyIdentifier} and {PartyId} from the above request payload represents Supplier’s Party Id

(GET) Instrument Assignment

Rest API to get instrument assignments. 

Endpoint:

https://ERPCloudInstance/fscmRestApi/resources/latest/instrumentAssignments?finder=PaymentInstrumentAttributes;Intent=Supplier,PaymentPartyId={PaymentPartyId}

{PaymentPartyId} – External {PayeeId} from the call GET External Payee Rest API.

(POST) Create Instrument Assignment


The below REST API is used to create instrument assignment to the created bank account.
In order to create Instrument Assignment, we need to setup our user as active worker.

Endpoint:

https://ERPCloudInstance/fscmRestApi/resources/latest/instrumentAssignments

Request Payload :

{
"PaymentPartyId": 333333,
"PaymentFlow": "DISBURSEMENTS",
"PaymentInstrumentId":122222223,
"PaymentInstrumentType": "BANKACCOUNT",
"Intent": "Supplier"
}


{PaymentPartyId} - represents external payee id from the REST call GET External Payees (which was derived from corresponding level (supplier/site) the bank is attached to the supplier )

{PaymentInstrumentId} – is the {BankAccountId} from the REST call GET External Bank Accounts.

Oracle Fusion : Query to fetch privileges and roles assigned to the user

Privileges:

/*Query to fetch privileges assigned to the user*/
SELECT DISTINCT u.user_display_name AS UserName,
  rt.role_name ,
  pt.name privilege_name
FROM ASE_PRIVILEGE_B p ,
  ASE_PRIVILEGE_TL pt,
  ASE_PRIV_ROLE_MBR m ,
  ASE_ROLE_B r ,
  ASE_ROLE_TL rt,
  ASE_USER_TL u ,
  ASE_USER_ROLE_MBR rm
WHERE 1=1
AND ( SYSDATE BETWEEN p.EFFECTIVE_START_DATE AND p.EFFECTIVE_END_DATE
OR p.EFFECTIVE_END_DATE IS NULL)
AND ( SYSDATE BETWEEN r.EFFECTIVE_START_DATE AND r.EFFECTIVE_END_DATE
OR r.EFFECTIVE_END_DATE IS NULL)
AND p.PRIVILEGE_ID       = m.PRIVILEGE_ID
AND m.role_id            =r.role_id
AND u.LANGUAGE           = 'US'
AND rm.user_id           = u.user_id
AND rm.role_id           = r.role_id
AND pt.PRIVILEGE_ID      = p.PRIVILEGE_ID
AND pt.LANGUAGE          = 'US'
AND rt.role_id           = r.role_id
AND rt.LANGUAGE          = 'US'
AND ( SYSDATE BETWEEN m.EFFECTIVE_START_DATE AND m.EFFECTIVE_END_DATE
OR m.EFFECTIVE_END_DATE IS NULL)
AND ( SYSDATE BETWEEN rm.EFFECTIVE_START_DATE AND rm.EFFECTIVE_END_DATE
OR rm.effective_end_date IS NULL)
AND u.user_display_name   = :p_user_name
ORDER BY 1,2,3

Roles:

/*Query to fetch roles assigned to the user*/
SELECT pu.user_id,
  pu.username,
  ppnf.full_name,
  prdt.role_id,
  prdt.role_name,
  prd.role_common_name,
  prdt.description,
  TO_CHAR (pur.start_date, 'DD-MON-YYYY') role_start_date,
  TO_CHAR (pur.end_date, 'DD-MON-YYYY') role_end_date,
  prd.abstract_role,
  prd.job_role,
  prd.data_role,
  prd.duty_role,
  prd.active_flag
FROM per_user_roles pur,
  per_users pu,
  per_roles_dn_tl prdt,
  per_roles_dn prd,
  per_person_names_f ppnf
WHERE 1                           = 1
AND pu.user_id                    = pur.user_id
AND prdt.role_id                  = pur.role_id
AND prdt.language                 = USERENV ('lang')
AND prdt.role_id                  = prd.role_id
AND NVL (pu.suspended, 'N')       = 'N'
AND ppnf.person_id(+)             = pu.person_id
AND ppnf.name_type(+)             = 'GLOBAL'
AND pu.active_flag                = 'Y'
AND NVL (pu.start_date, SYSDATE) <= SYSDATE
AND NVL (pu.end_date, sysdate)   >= sysdate
AND pu.username                   = :p_user_name